+ Getting Started
+ Displaying the Campaign
- Campaign Settings
- Set who should see the Campaign
- Set When the Popup should be displayed
- Set Where the Popup should be displayed
- How to embed Brave Content inside Posts & Pages
- Schedule Popups to display on selected Dates/Days
- Opening a Popup On Click
- A/B testing Campaigns
- Display Dynamic Text inside Campaigns
- Creating Personalized Campaigns
+ Creating Forms
- Creating a Contact Form
- Creating a Newsletter Subscription Form
- Creating a Quiz Form
- Creating a multi-step Survey Form
- Saving Form Submissions in WordPress
- Inserting 3rd Party Forms instead of Brave Forms
- Let Visitors Download a file when they submit the Form
- Let Visitors Optin with their Social Accounts
- Send Automated Email Replies when someone submits the Form
- Conditionally Display Form Fields
- Connect your Form to Zapier
- Advanced Email Validation
- How to save form submissions in Google Sheets
- Track Form Submission with Facebook Pixel
+ Tracking the Campaign
- Setting up a Campaign’s Goal Tracking
- Brave Advanced Analytics
- Get Real-time Email Notification When a Campaign Goal is completed by a visitor
- Get Real-time Push Notification When a Campaign Goal is completed by a visitor
- Get Real-time SMS Notification When a Campaign Goal is completed by a visitor
- Track Campaign Goals with Google Analytics
+ Integrations
- Integrate AWeber
- Integrate ActiveCampagin
- Integrate Mailchimp
- Integrate GetResponse
- Integrate Hubspot
- Integrate Mailjet
- Integrate Mailer Lite
- Integrate Convertkit
- Integrate Campaign Monitor
- Integrate ConstantContact
- Integrate Moosend
- Integrate Sendgrid
- Integrate SendPulse
- Integrate Sendinblue
- Integrate Ontraport
- Integrate Klaviyo
- Integrate Pabbly
- Integrate Zoho Campaign & CRM
- Integrate Mailpoet
- Integrate The Newsletter Plugin
- Integrate Mailster
- Integrate Sendy
- Integrate Omnisend
- Integrate Fluent CRM
- Integrate Neverbounce Email Validation
- Integrate Zerobounce Email Validation
- Integrate Truemail Email Validation
- Integrate Facebook Login
- Integrate Google Login
- Integrate LinkedIn Login
- Integrate Google Recaptcha
+ Tutorials
+ Woocommerce
+ Developers
Brave Editor Interface
Brave’s Intuitive editor can be used by anyone without any prior knowledge as it matches the interface of common design applications like Photoshop and Canva.
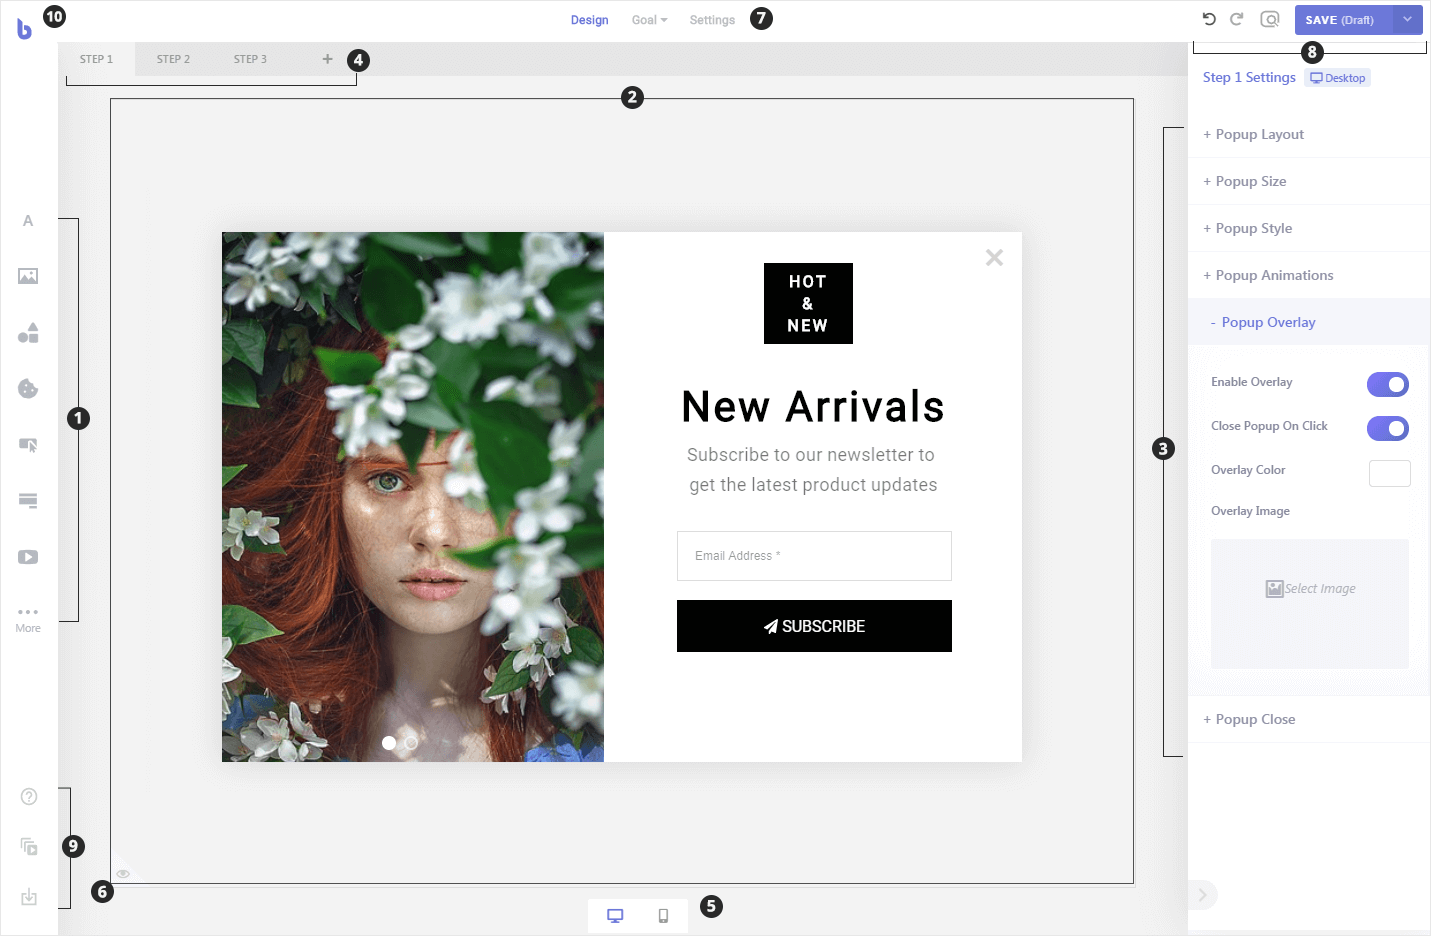
- Elements Panel: Drag elements like Text, Image, Shapes, Videos, Forms etc from this panel and place them in your Canvas (2)
- The Canvas: This is where you place your element to create your Popups, stickybars, sidebars etc.
- The Settings Panel: This area displays your campaign’s crucial settings like, size, position, background color etc. When you select an element, this area displays that element’s settings.
- Steps Panel: This is where your campaign steps are displayed. You can create, duplicate remove steps from this panel.
- Device Layout Switcher: This is where you can switch between the builder mode to Mobile or Desktop so that you can create/view separate design for separate devices.
- Overlay Preview Button: When this Eye icon is clicked, it displays the background Overlay of the Popup. When you are designing the Popup Overlay, you can turn this one to get real-time feedback.
- Settings & Goal Switcher: From this panel you can switch between the design, goal and settings panel.
- Preview & Save Panel: From this panel you are able to undo/redo your actions, preview your popups and save your popup.
- Footer Panel: From this panel, you can easily access Brave’s Documentation, Advanced Timeline Animation Editor & the Preset Importer.
- Back Button: The Brave logo on top left corner of the screen lets you go back to your campaign lists Interface.
Note: When you are in the “Content” Editing Mode, the Overlay Preview Button (6) is replaced with “Guides” menu. You can insert horizontal or vertical guides in your canvas to precisely align elements. And remove them when they are not needed anymore, by right clicking on them and deleting them.