+ Getting Started
+ Displaying the Campaign
- Campaign Settings
- Set who should see the Campaign
- Set When the Popup should be displayed
- Set Where the Popup should be displayed
- How to embed Brave Content inside Posts & Pages
- Schedule Popups to display on selected Dates/Days
- Opening a Popup On Click
- A/B testing Campaigns
- Display Dynamic Text inside Campaigns
- Creating Personalized Campaigns
+ Creating Forms
- Creating a Contact Form
- Creating a Newsletter Subscription Form
- Creating a Quiz Form
- Creating a multi-step Survey Form
- Saving Form Submissions in WordPress
- Inserting 3rd Party Forms instead of Brave Forms
- Let Visitors Download a file when they submit the Form
- Let Visitors Optin with their Social Accounts
- Send Automated Email Replies when someone submits the Form
- Conditionally Display Form Fields
- Connect your Form to Zapier
- Advanced Email Validation
- How to save form submissions in Google Sheets
- Track Form Submission with Facebook Pixel
+ Tracking the Campaign
- Setting up a Campaign’s Goal Tracking
- Brave Advanced Analytics
- Get Real-time Email Notification When a Campaign Goal is completed by a visitor
- Get Real-time Push Notification When a Campaign Goal is completed by a visitor
- Get Real-time SMS Notification When a Campaign Goal is completed by a visitor
- Track Campaign Goals with Google Analytics
+ Integrations
- Integrate AWeber
- Integrate ActiveCampagin
- Integrate Mailchimp
- Integrate GetResponse
- Integrate Hubspot
- Integrate Mailjet
- Integrate Mailer Lite
- Integrate Convertkit
- Integrate Campaign Monitor
- Integrate ConstantContact
- Integrate Moosend
- Integrate Sendgrid
- Integrate SendPulse
- Integrate Sendinblue
- Integrate Ontraport
- Integrate Klaviyo
- Integrate Pabbly
- Integrate Zoho Campaign & CRM
- Integrate Mailpoet
- Integrate The Newsletter Plugin
- Integrate Mailster
- Integrate Sendy
- Integrate Omnisend
- Integrate Fluent CRM
- Integrate Neverbounce Email Validation
- Integrate Zerobounce Email Validation
- Integrate Truemail Email Validation
- Integrate Facebook Login
- Integrate Google Login
- Integrate LinkedIn Login
- Integrate Google Recaptcha
+ Tutorials
+ Woocommerce
+ Developers
A/B testing Campaigns
With Brave Pro you can A/B test your campaigns by creating multiple variations of each campaign and serving them randomly. A/B test is great for optimizing your conversion rate. When you create a new variation of your campaign, you can change text, image of the variation or change the design completely to create a whole new popup design. This gives you the ability to serve completely two or more different types of popups (eg: topbar popup or a sidebar popup).
To A/B test your campaigns in Brave, follow these steps:
- From your WordPress dashboard, go to Brave > All Campaigns.
- Click the A/B test icon beside the name of the popup that you want to A/B test.
- Then click the “Create New Variation” button.
- Give the new variation a name. eg: (My popup variation 2) and click the “Create New Popup Variation” button.
- A new variation will be created.
- Open the newly created variation of the popup that appeared under your selected popup and make the necessary changes and save the variation.
- You can create as many variations you want.
- After you have created all your custom variations, Click the “Start Test” button
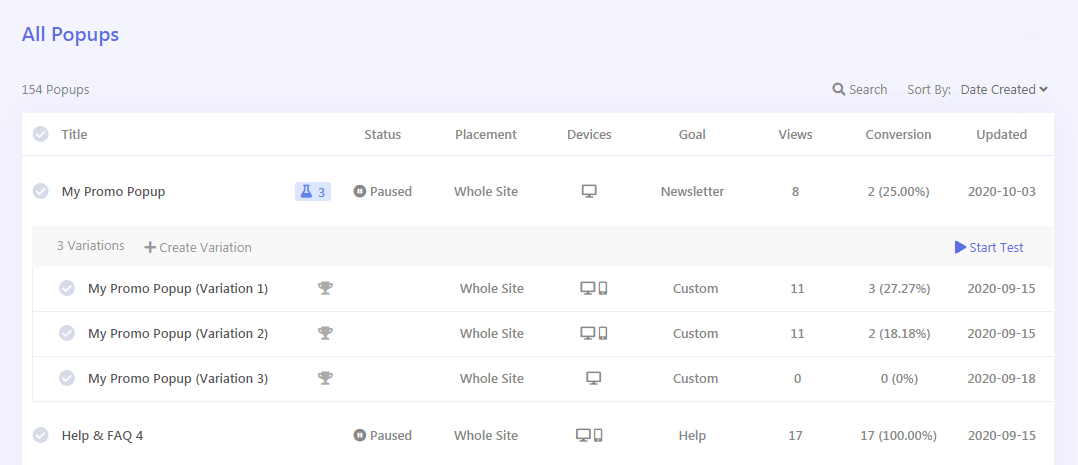
- Brave will now display different variations to different visitors and update the conversion and view count.
- You can leave this A/B testing for few days to figure out which has the most conversion rate.
- Once you have found the one with the most conversion rate, click the “Cup” icon beside the variation to pick it as a Winner.
- When you select a Winner, all your popup variations will be removed including the original one except for the Winning popup.
Note: If your original popup has a Click or Form submission set as the popup goal, you will have to re-select the goal elements for each variation.