+ Getting Started
+ Displaying the Campaign
- Campaign Settings
- Set who should see the Campaign
- Set When the Popup should be displayed
- Set Where the Popup should be displayed
- How to embed Brave Content inside Posts & Pages
- Schedule Popups to display on selected Dates/Days
- Opening a Popup On Click
- A/B testing Campaigns
- Display Dynamic Text inside Campaigns
- Creating Personalized Campaigns
+ Creating Forms
- Creating a Contact Form
- Creating a Newsletter Subscription Form
- Creating a Quiz Form
- Creating a multi-step Survey Form
- Saving Form Submissions in WordPress
- Inserting 3rd Party Forms instead of Brave Forms
- Let Visitors Download a file when they submit the Form
- Let Visitors Optin with their Social Accounts
- Send Automated Email Replies when someone submits the Form
- Conditionally Display Form Fields
- Connect your Form to Zapier
- Advanced Email Validation
- How to save form submissions in Google Sheets
- Track Form Submission with Facebook Pixel
+ Tracking the Campaign
- Setting up a Campaign’s Goal Tracking
- Brave Advanced Analytics
- Get Real-time Email Notification When a Campaign Goal is completed by a visitor
- Get Real-time Push Notification When a Campaign Goal is completed by a visitor
- Get Real-time SMS Notification When a Campaign Goal is completed by a visitor
- Track Campaign Goals with Google Analytics
+ Integrations
- Integrate AWeber
- Integrate ActiveCampagin
- Integrate Mailchimp
- Integrate GetResponse
- Integrate Hubspot
- Integrate Mailjet
- Integrate Mailer Lite
- Integrate Convertkit
- Integrate Campaign Monitor
- Integrate ConstantContact
- Integrate Moosend
- Integrate Sendgrid
- Integrate SendPulse
- Integrate Sendinblue
- Integrate Ontraport
- Integrate Klaviyo
- Integrate Pabbly
- Integrate Zoho Campaign & CRM
- Integrate Mailpoet
- Integrate The Newsletter Plugin
- Integrate Mailster
- Integrate Sendy
- Integrate Omnisend
- Integrate Fluent CRM
- Integrate Neverbounce Email Validation
- Integrate Zerobounce Email Validation
- Integrate Truemail Email Validation
- Integrate Facebook Login
- Integrate Google Login
- Integrate LinkedIn Login
- Integrate Google Recaptcha
+ Tutorials
+ Woocommerce
+ Developers
Creating Personalized Campaigns
Personalized campaigns can boost your conversion significantly by displaying data that relates to the visitor.
With Brave PRO there are multiple ways to create a personalized Campaign that can grab visitor’s attention and increase your conversion rates. Here are ways you can create personalized campaigns:
- Display a specific Values in your URL inside the Campaign Text.
- Save visitors name, email or other information in their browser when they submit a form and display the values in subsequent campaigns.
- Display logged-in user’s value from their profile.
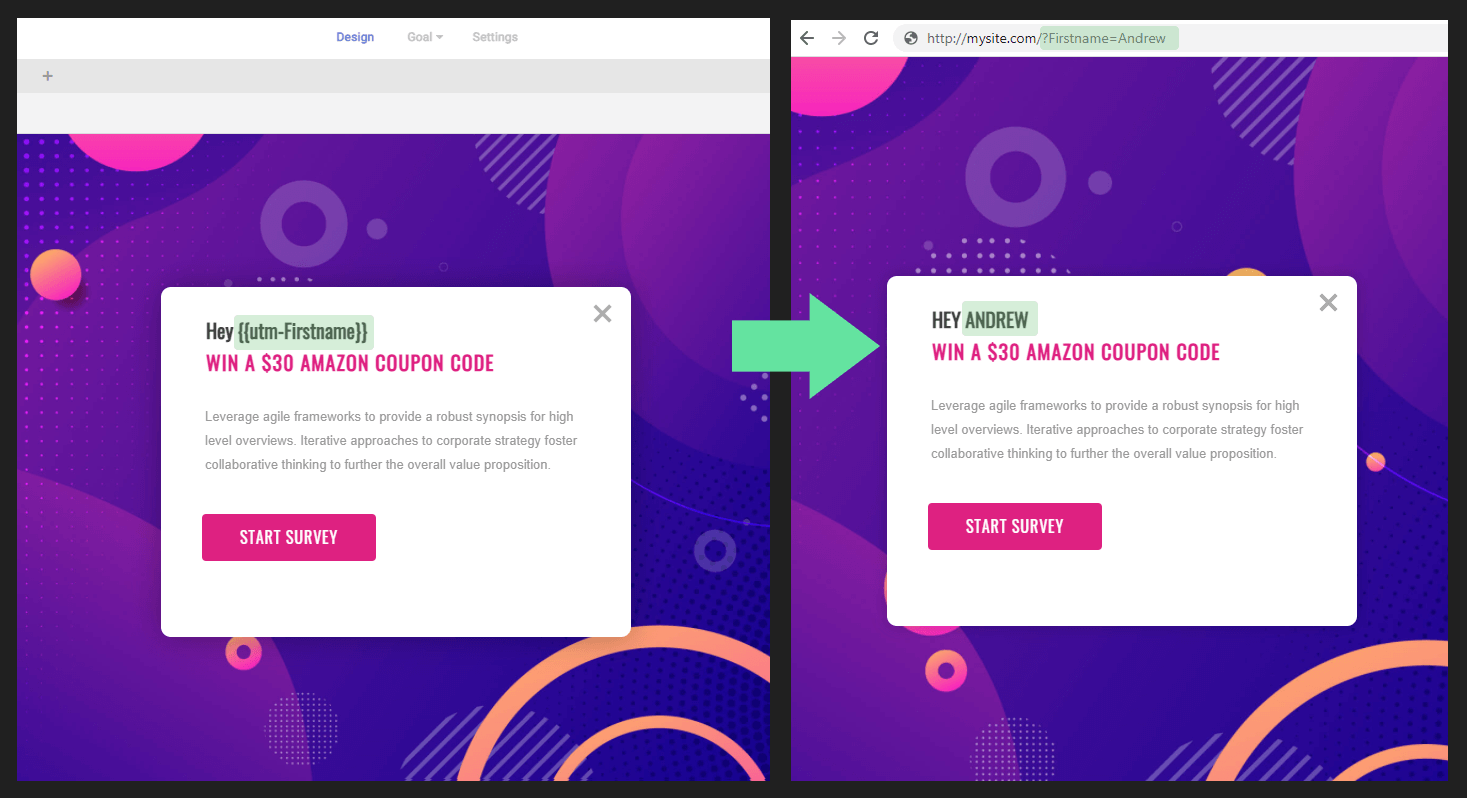
Display a specific Values in your URL inside the Campaign Text
Suppose you want to direct visitors to a personalized campaign that displays their first name in the copy and already have their names. To achieve that, You can simply build a custom url that contains their first name and then display the value from the url inside the copy of the campaign with the utm key shortcode {{utm-KEY_NAME}} . Then you can send the custom link to the person whom you want to display the personalized campaign.
Lets see how you can do that with 3 simple steps:
- Creating the Custom URL: To create a custom URL that will contain the specific personal data value of the person, you can simply add a /?Keyname=keyvalue at the end of your page url you are trying to share. For example, if you know the person’s name and you want to display it in the copy, you can build the url this way: https://mysite.com/specific-page/?Name=Andrew . One thing to note here is that your keyname, should be always capitalized, eg: Name, instead of name.
- Displaying the Value: Inside your Text element, where you want to display the value, you can simply write {{utm-Name}} and the text will be replaced with Andrew .
- Only displaying the Campaign if the url contains the UTM key name: If you want to display the campaign only when the url contains the key name “Name”, and not for other links, you can simply go to Settings > Advanced Filters, and enable the “Only show If the URL has specific UTM Keywords” option. Then insert the UTM key name inside the UTM key field . Now the Campaign will only show up if the url has that UTM keyword. in our case only if the url contains: /?Name
Use Case 1: Lets say You are sending a newsletter to your subscribers and since you have their names, you want to send them to a Survey campaign(created with Brave) contains their name so that the message is more personalized. What you can do is, use your ESP’s first name variable to create the link. Most ESPs provide you with various shortcodes like [[firstname]], [[lastname]] etc. What you can do is, insert a link in your email like this one to send them to the personalized campaign: https://mysite.com/specific-page/?Name=[[firstname]] . Now when you send out the newsletter your ESP will automatically replace the [[firstname]] variable with the receiver’s first name so the url for say Robert will look like https://mysite.com/specific-page/?Name=Robert.
Use Case 2: Lets say you are in conversation (facebook, linkedin or other public sites) with a potential customer that you want to charm and already know their name and the city they are from. What you can do is, send them to a promotional campaign that you created in Brave and has the shortcode {{utm-Name}} and {{utm-City}} in the copy. What you can do is, create send a link like this one to personalize your copy to that specific potential customer: https://mysite.com/specific-page/?Firstname=Andrew&City=Kentucky . Now When they visit the link, the {{utm-Firstname}} will be converted to “Andrew” and the {{utm-City}} shortcode will be converted to “Kentucky”.
Saving Form Submitted value and then display them later inside Campaign Text
Suppose you have created newsletter optin form with a First name field where visitor has to insert their first name. With Brave you can save the submitted field value inside visitor’s browser so that you can later display this value inside other Campaigns to personalize the campaign and improve your conversion rate. Lets see how we can save a name field value inside visitor’s browser and display them anytime we want in other campaigns.
Step 1 :Saving the Form Field Value:
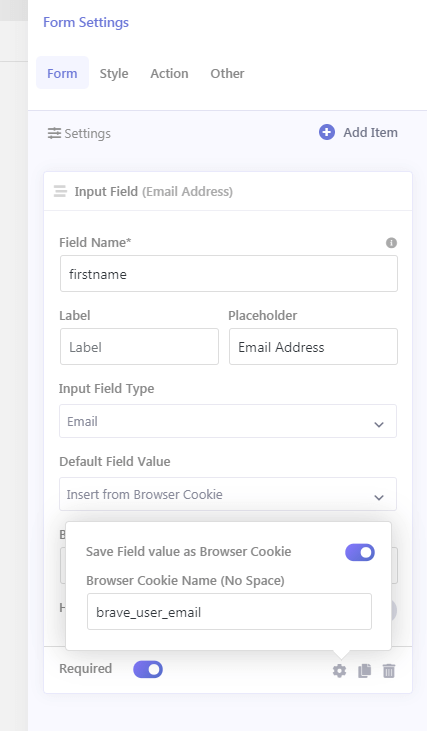
- Open you Form Fields Panel and from the field that you want to save the value, click the Gear icon.
- A New box will show up with the option “Save Field value as Browser Cookie“.
- Then insert the key name that you want to save the value with. Lets write user_firstname so that we can later display it with this key. Save your Campaign.
Now when a visitor submits the form with the value “Andrew” for the firstname field, the value Andrew will be saved in the browser with key user_firstname
Step 2: Displaying the Saved Submitted value Campaign
To display the saved value inside another campaign, insert a Text Element and simply write down {{cookie-user_firstname}} in it.
Now when the visitor visits this campaign, the value will be replaced with the one that they submitted the form with. eg: Andrew.
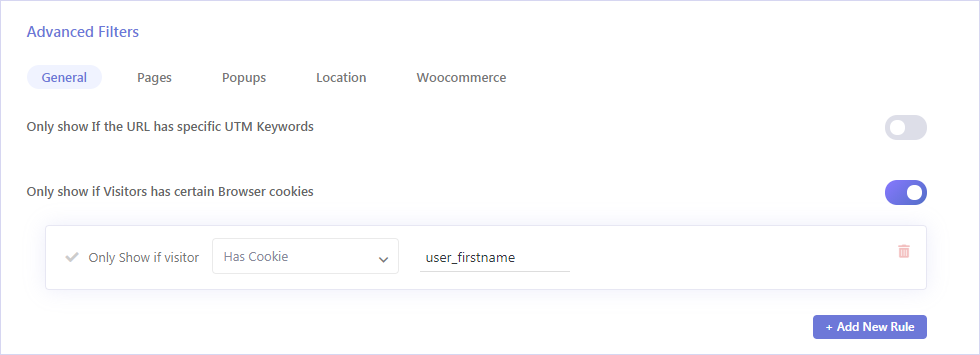
Step 3: Displaying Campaigns only if the saved cookie is present
lets say you created a campaign that contains the cookie key for personalization and you do not want to display this campaign to those who did not submit the optin form yet. What you can do is:
- Go to Settings> Advanced Filters and then enable the “Only show if Visitors has certain Browser cookies” option.
- Click “Add New Rule” button and make sure the “Has Cookie” option is selected.
- Insert the cookie key name that you saved the field value with (eg: user_firstname)
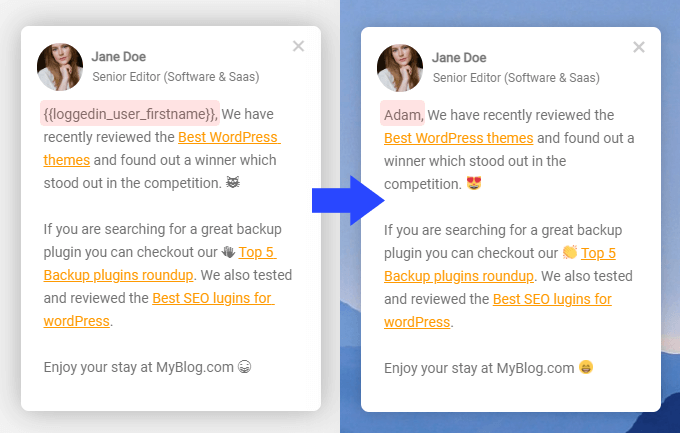
Display logged-in user’s value from their profile
Brave comes with various user profile field shortcode that you can insert in your campaigns to display the profile field values. This is great for online shops and communities that has registration feature and the user is saved in WordPress database.
Here are all the user profile field shortcodes that you can use:
{{loggedin_user_email}} : If the user is logged in, displays their email address.
{{loggedin_user_name}} : If the user is logged in, displays their Full Name (if full name is missing, displays their username).
{{loggedin_user_firstname}} : If the user is logged in, displays their first name.
If you want to only display campaigns only to registered users, you can do so by going to Settings screen of your campaign and then changing the Audience type to “Registered Users”.