+ Getting Started
+ Displaying the Campaign
- Campaign Settings
- Set who should see the Campaign
- Set When the Popup should be displayed
- Set Where the Popup should be displayed
- How to embed Brave Content inside Posts & Pages
- Schedule Popups to display on selected Dates/Days
- Opening a Popup On Click
- A/B testing Campaigns
- Display Dynamic Text inside Campaigns
- Creating Personalized Campaigns
+ Creating Forms
- Creating a Contact Form
- Creating a Newsletter Subscription Form
- Creating a Quiz Form
- Creating a multi-step Survey Form
- Saving Form Submissions in WordPress
- Inserting 3rd Party Forms instead of Brave Forms
- Let Visitors Download a file when they submit the Form
- Let Visitors Optin with their Social Accounts
- Send Automated Email Replies when someone submits the Form
- Conditionally Display Form Fields
- Connect your Form to Zapier
- Advanced Email Validation
- How to save form submissions in Google Sheets
- Track Form Submission with Facebook Pixel
+ Tracking the Campaign
- Setting up a Campaign’s Goal Tracking
- Brave Advanced Analytics
- Get Real-time Email Notification When a Campaign Goal is completed by a visitor
- Get Real-time Push Notification When a Campaign Goal is completed by a visitor
- Get Real-time SMS Notification When a Campaign Goal is completed by a visitor
- Track Campaign Goals with Google Analytics
+ Integrations
- Integrate AWeber
- Integrate ActiveCampagin
- Integrate Mailchimp
- Integrate GetResponse
- Integrate Hubspot
- Integrate Mailjet
- Integrate Mailer Lite
- Integrate Convertkit
- Integrate Campaign Monitor
- Integrate ConstantContact
- Integrate Moosend
- Integrate Sendgrid
- Integrate SendPulse
- Integrate Sendinblue
- Integrate Ontraport
- Integrate Klaviyo
- Integrate Pabbly
- Integrate Zoho Campaign & CRM
- Integrate Mailpoet
- Integrate The Newsletter Plugin
- Integrate Mailster
- Integrate Sendy
- Integrate Omnisend
- Integrate Fluent CRM
- Integrate Neverbounce Email Validation
- Integrate Zerobounce Email Validation
- Integrate Truemail Email Validation
- Integrate Facebook Login
- Integrate Google Login
- Integrate LinkedIn Login
- Integrate Google Recaptcha
+ Tutorials
+ Woocommerce
+ Developers
Creating a Quiz Form
With Brave PRO, you can create Quiz Form to boost your newsletter subscription rate and get more data out of leads that otherwise would have been very hard to acquire. You can also use Quiz Forms in various other ways. Here is why you should use quiz forms for better lead collection:
- Improve lead capture rate by a x2 to x3.
- Get more data about the lead without having to get in touch with them.
- Easy lead scoring without having to rely on other tools.
- Add leads to different newsletter based on their quiz result.
- Add tags to your leads in your ESP or CRM based on their quiz result.
- Showing different offers and services based on quiz result.
- Finding suitable products based on your user input and let them know which one fits their needs.
How Brave Quiz Forms Work
Brave lets you create Quizzes with just a few simple steps. You can create setup your quiz to have points based scoring system or correct/incorrect quiz system like exams. You can either use it as quiz on your site and display the Quiz score to users or use the quiz points system internally to segment users and add contacts to different newsletter list and/or send them to offers based on their quiz result.
Creating a Points based Quiz in Brave
Follow the below steps to create a points based multi-step Quiz Form in Brave PRO.
1. Drag and drop a Form element from the left sidebar into your canvas.
2. Select the Form and to open the Form Settings Panel.
3. Click the Settings button from the top left corner of this tab and change the Form Type to “Quiz”.
4. Quizzes must have multiple steps in them. You can add a new step by clicking the “+ Add Item” button.
4. Now you will be able to assign points to Fields that lets you create multiple options. You can assign points to each option based on your need. The fields that let you assign points to them are tagged with a “Q” mark beside them in the Add Field layout. These fields are:
- Checkbox
- Radio
- Image Select
- Drop down
- Buttons Group
5. Insert any of these fields into your Form and set points to each of the options of this field. The highest point that can be achieved for this field is shown in field header. To you change the points for each option click the “0pts’ text above each option and it will bring a small points editor field, where you can insert the new points number.
Displaying the Quiz Result
Displaying the Quiz Result with shortcodes
Once user submits the quiz, you have the option to display your Quiz Results with the following shortcodes in different places of your form:
- [available_score] :To display the total available points that can be achieved.
- [total_score] : To display the user’s total Quiz points.
If you are using “Answer based Quiz”, you can display the quiz results with following shortcodes:
- [total_questions] :To display the total number of questions in your Quiz.
- [total_correct_answers] : To display the user’s total total correct answers count.
These Shortcodes can be used in your Quiz Form’s:
- Submissions Success Message’s Custom Message Field, Redirect Message and URL field.
- Automated Email’s body and subject.
- Receive an Email section’s Custom Email Template field.
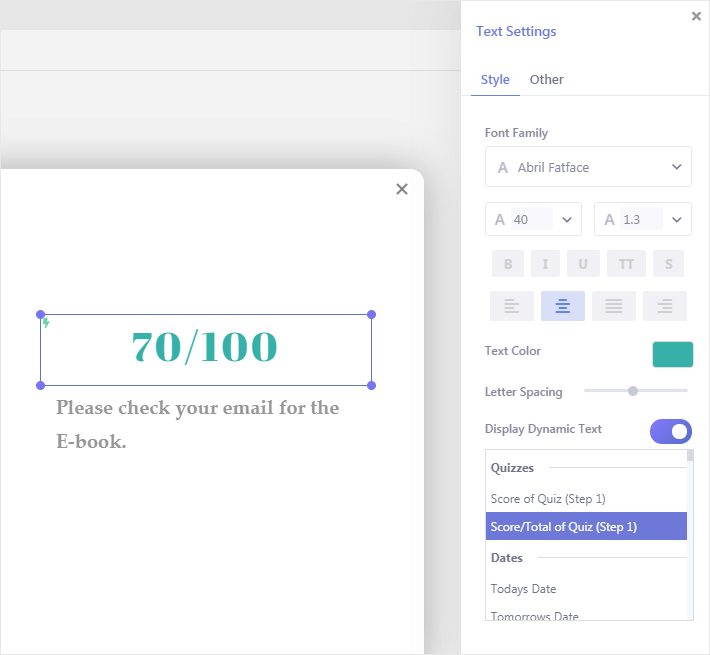
Displaying the the Quiz Result inside another step of the Campaign
You can also display the score in other Steps of your Campaign. To do that,
- Create a new step from top left corner of the page.
- Insert a Text element in your new step.
- From the Text Element’s Settings panel, enable the “Display Dynamic Text’ option.
- Then either select the first or the second option under the Quiz Section.
Perform Different Actions based on Quiz Result
When users submits the quiz form you can do a combination of following:
Take users to a different Step of the Campaign based on user’s Quiz Result
Lets say you have created a campaign that has a quiz and you want to display users different content based on their Quiz result. What you can do is, create multiple campaign steps with different messages and send them to any of these steps, based on their quiz results. To set up these conditional step redirection, follow these steps:
- Click your Form to open the Form Settings panel, and then click the “Actions” tab and then click the Submission Success Action Tab.
- Select Go to Another Step
- Enable the Go to Different Steps based on submitted Form data option.
- Click the + Add Condition button and a new condition will be added.
- Select Quiz Points from the first drop down menu.
- To match quiz points exactly to certain quiz score, select Equal from the 2nd drop down menu and insert the quiz score you want to match. Then in the last field, write the step number you want visitors to go to when their score is the exact match.
- To match quiz points between 2 quiz score (eg: 10-20), select Between from the 2nd drop down menu and insert the 2 numbers with a hyphen in between them: 10-20. Then in the last field, write the step number you want visitors to go to when their score is between that 2 specified numbers.
- Finally set a fallback step by entering the step number in the Go to Step field. If the conditions do not match, user will be sent to this step.
Redirect user to different page based on the user’s Quiz Result
Lets say you have created a campaign that has a quiz and you want to redirect users to different pages of your website based on their quiz result. To set up these conditional url redirection, follow these steps:
- Click your Form to open the Form Settings panel, and then click the “Actions” tab and then click the Submission Success Action Tab.
- Select Redirect to Another Page
- Enable the Go to Different URL based on submitted Form data option.
- Click the + Add Condition button and a new condition will be added.
- Select Quiz Points from the first drop down menu.
- To match quiz points exactly to certain quiz score, select Equal from the 2nd drop down menu and insert the quiz score you want to match. Then in the last field, insert the page URL you want visitors to go to when their score is the exact match.
- To match quiz points between 2 quiz score (eg: 10-20), select Between from the 2nd drop down menu and insert the 2 numbers with a hyphen in between them: 10-20. Then in the last field, insert the page URL you want visitors to go to when their score is between that 2 specified numbers.
- Finally set a fallback redirect URL by entering the step number in the Redirect to field . If the conditions do not match, user will be redirect to this fallback URL.
Send Automated Emails to Subscribers with conditional message based on Quiz Result
If you have setup a quiz form and want to send visitors your offers through emails based on their quiz result, you can do so by following these steps:
- Click your Form to open the Form Settings panel, and then click the “Actions” tab and then click the Send Automated Email Reply to Visitor Tab.
- You can insert the shortcode [total_score] , [available_score] to display visitors quiz score in your email body or subject.
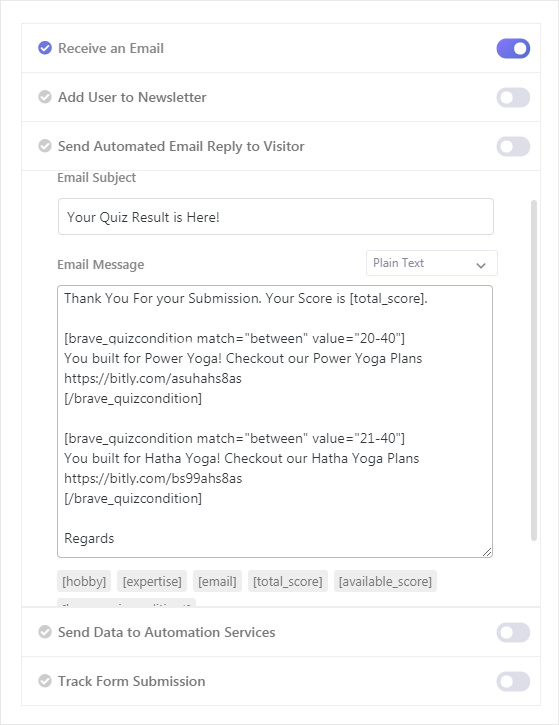
- if you want to send a certain message based on visitors quiz result, you can do so with shortcode.
- To show a certain content, if the quiz score is equal to a certain number:
[brave_quizcondition match="equal" value="40"] This content will only show if the score is 40 - To show a certain content, if the quiz score is not equal to a certain number:
This content will only show if the score is not 20 - To show a certain content, if the quiz score is between two numbers:
Subscribe user to different newsletter list or add tags based on Quiz Result
You can also add contacts to different lists in your ESP or CRM based on the quiz result. You can achieve that by following these steps:
- Click your Form to open the Form Settings panel, and then click the “Actions” tab and then click the Add User to Newsletter Tab.
- Select your Service Provider from the Select Service Drop down list.
- Enable the Advanced Mode.
- Click the Newsletter Signup Settings button.
- From the Advanced Newsletter Signup Mode window, enable the Conditional Subscription option.
- Click the + Add Condition button to add a new condition.
- For our first condition, lets say we want to add users we scored 20-40 to a list and also add a tag “intermediate”. To do that, First select your List from the newly appeared condition box. Then click the + icon to add the condition. A small popup will show up. Select “Quiz Result” from the Condition Type drop down list. Then from the drop down list below select Quiz Points is Between option and in the input field, write down 20-40 and click the Add Rule button.
To add a tag who matches this condition, click the tag icon from the condition box and insert your tag. - In similar fashion, you can add more conditions to match other quiz scores and have added to different newsletter list.
- Finally from the If No conditions match, subscribe to section in the bottom, you select the list you want to add the contact if they do not match your condition.
A real life use case example of quiz forms to find prospects
Suppose you are a Yoga instructor and trying to find prospects that you can easily convert to become a client. You know that the people who might take your Yoga classes are those who are comfortable with mild daily activities or have planned to take a Yoga class in future. And you want to avoid people who do not like activities or has no plans to take any Yoga class ever.
In that case, what you can do is, create a simple 3 step assessment quiz form. You can add a checkbox field with these options and points :
Step 1: What kind of activities are you comfortable with?
- I like any kinds of activities (10 pts)
- I am comfortable with performing mild activities (10 pts)
- I do not like physical activities. (0 pts)
Step 2: Have ever thought of taking a Yoga Class?
- Yes I have plans to take Yoga classes soon. (10 pts)
- I am still thinking about it. (5 pts)
- I do not have any plans to attend any Yoga classes. (0 pts)
Step 3: Get your Assessment Result
In this step, the user will insert their name email address, which will be used to send the result based on the assessment.
- Your Name
- Your Email Address
The users who scored 20pts in the quiz, you can be sure that they can be easily converted to clients as they like activities and have plans to take Yoga classes. You can directly send them your offer with high success rate and very low rate of them rejecting your offer.
The users who scored 15pts in the quiz, can be converted to client, but needs more persuasion as they are still not sure whether they should take Yoga classes or not. Instead of sending them your offer directly, you can share the benefits of doing Yoga through emails and/or redirect them to pages on your site to learn more about benefits of Yoga.
The users who scored 0pts are unlikely to convert to a client as they are not interested in taking a Yoga classes and do not like physical activities. If you do not wish to pursue them to be your client, you can simply add them to your CRM or ESP with “not interested” tag or add them to a different newsletter list than others.