+ Getting Started
+ Displaying the Campaign
- Campaign Settings
- Set who should see the Campaign
- Set When the Popup should be displayed
- Set Where the Popup should be displayed
- How to embed Brave Content inside Posts & Pages
- Schedule Popups to display on selected Dates/Days
- Opening a Popup On Click
- A/B testing Campaigns
- Display Dynamic Text inside Campaigns
- Creating Personalized Campaigns
+ Creating Forms
- Creating a Contact Form
- Creating a Newsletter Subscription Form
- Creating a Quiz Form
- Creating a multi-step Survey Form
- Saving Form Submissions in WordPress
- Inserting 3rd Party Forms instead of Brave Forms
- Let Visitors Download a file when they submit the Form
- Let Visitors Optin with their Social Accounts
- Send Automated Email Replies when someone submits the Form
- Conditionally Display Form Fields
- Connect your Form to Zapier
- Advanced Email Validation
- How to save form submissions in Google Sheets
- Track Form Submission with Facebook Pixel
+ Tracking the Campaign
- Setting up a Campaign’s Goal Tracking
- Brave Advanced Analytics
- Get Real-time Email Notification When a Campaign Goal is completed by a visitor
- Get Real-time Push Notification When a Campaign Goal is completed by a visitor
- Get Real-time SMS Notification When a Campaign Goal is completed by a visitor
- Track Campaign Goals with Google Analytics
+ Integrations
- Integrate AWeber
- Integrate ActiveCampagin
- Integrate Mailchimp
- Integrate GetResponse
- Integrate Hubspot
- Integrate Mailjet
- Integrate Mailer Lite
- Integrate Convertkit
- Integrate Campaign Monitor
- Integrate ConstantContact
- Integrate Moosend
- Integrate Sendgrid
- Integrate SendPulse
- Integrate Sendinblue
- Integrate Ontraport
- Integrate Klaviyo
- Integrate Pabbly
- Integrate Zoho Campaign & CRM
- Integrate Mailpoet
- Integrate The Newsletter Plugin
- Integrate Mailster
- Integrate Sendy
- Integrate Omnisend
- Integrate Fluent CRM
- Integrate Neverbounce Email Validation
- Integrate Zerobounce Email Validation
- Integrate Truemail Email Validation
- Integrate Facebook Login
- Integrate Google Login
- Integrate LinkedIn Login
- Integrate Google Recaptcha
+ Tutorials
+ Woocommerce
+ Developers
Reducing Woocommerce Cart Abandonment with Exit Intent Popups
Woocommerce cart abandonment issue is one the most common revenue gutting issue most Woocommerce stores face. Luckily it can be easily solved by offering leaving customers special discount or Free shipping offer for a limited time so that user is urged to take action immediately. Since you do not want to offer this special discounts and offers to everyone and just the visitors who added products to their cart but leaving the site, you will have to display your offer only when the visitor is trying to leave the site.
With Brave PRO, you can easily detect when a visitor is trying to leave the site with Exit Intent Trigger option. There are 2 ways to deliver your special offer to the leaving customers.
- Displaying your Offer with a Discount immediately to the leaving visitor that they can apply to their cart.
- Subscribing the visitor to your Newsletter and then Automatically send the Discount to their email.
1. Displaying your Offer with a Discount immediately to the leaving visitor
If you want your visitors to not leave your site without completing the purchase, you can urge visitor to immediately take action and complete the purchase by offering a limited time discount. To create a perfect cart abandonment popup, you should specifically state the Discount Code and Mention that the Offer only applies to the current customer (even though it may not be exclusive to the current customer) and that the offer is for limited time only. Follow these below steps to create a Cart Abandonment Popup.
Step 1 : Create a Popup with special offer that does not appear anywhere in the website. This can be a special discount or it can be a Free shipping offer. You can easily import from Brave’s Existing Cart Abandonment Popup templates and customize it to your need. You can import the Preset when creating the Popup or anytime from the Preset section of the Popup editor.

Some of the Cart abandonment popups that come with Brave PRO
Step 2 : Display a Countdown timer with Offer that will display when the offer is going to expire. Usually 30 minutes works best. To insert a Countdown timer in your Popup, from the Elements Panel on left, click the 3 dots and then drag and drop the countdown timer element to your Popup. Usually Countdown timer count downs to a certain date but since we want the countdown timer to act like stop watch that will count down to 30 minutes. We will select the Auto (Evergreen) option Countdown Type drop down list.
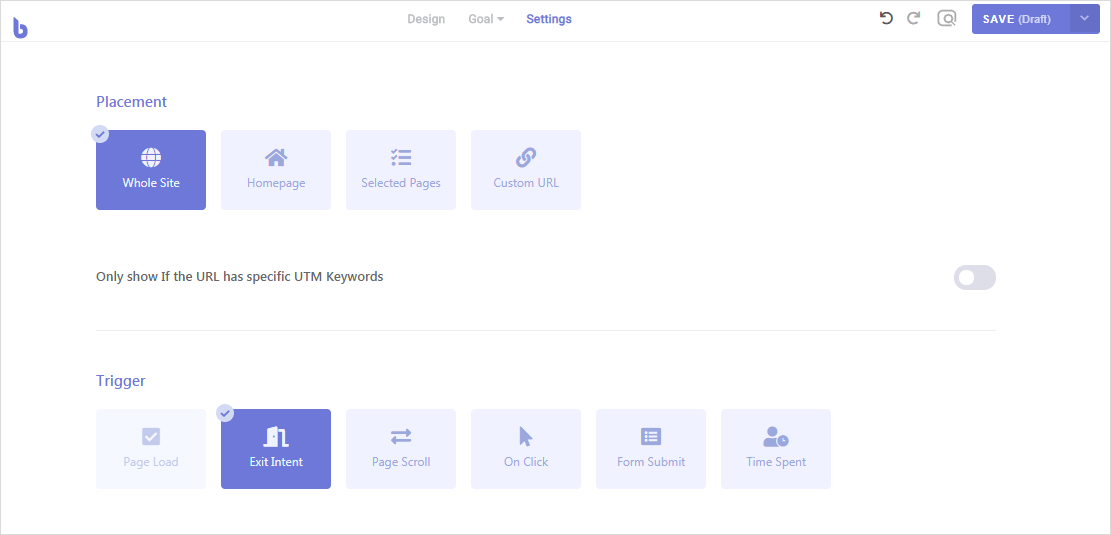
Step 3 : Set the Trigger option to “Exit Intent” to display the offer only when the visitor is trying to exit your website. After you have designed your Popup, Click the “Settings” tab from top and set the Placement type to “Whole Site” or if you want to display the Popup only on Cart page, you can click the “Selected Pages” option and select the Cart Page.

Then from the Trigger Settings option, Just click the “Exit Intent” option to make the Popup Display when the visitor tries to leave the site.
2. Subscribing the visitor to your Newsletter and then Automatically send the Discount to their email
Although this method may be a little less efficient in converting the leaving visitor, it forces visitors to first subscribe to your newsletter by proving their email address which you can later use to promote products. What’s great abut this method is that even if the visitor does not buy the product, you can send them special promos, offers, and new arrival emails that may make them a customer later in future.
Step 1 : Create a Newsletter Subscription Popup with a message that says “Don’t Go, get Let us send you a Massive Discount Code” or something along that line. Inserting a Newsletter subscription form is very easy with Brave. When creating the Popup, select Newsletter Subscription option as goal to access all the Newsletter presets and click “Create”.
Step 2: You can either set the customized email with the discount through your Newsletter service provider (Mailchimp, Mailpoet, AWeber etc) by setting up a welcome email for new subscriber from the service provider’s dashboard.
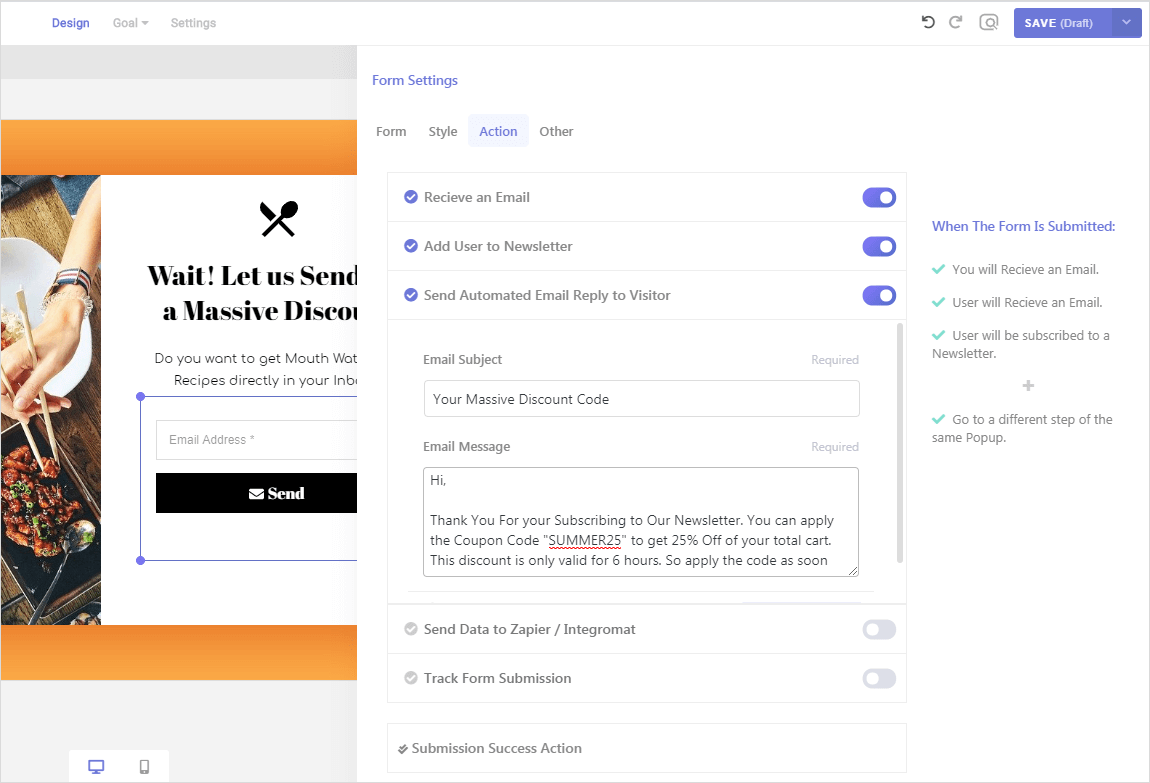
Or, You can use Brave to automatically email the Discount code to subscriber user immediately. To do that, just click the Subscription Form and then click the “Action” tab from the Form’s Settings panel. Now enable the “Send Automated Email Reply to Visitor” option and then customize the email message to your need. The email will be sent as a plain text email so avoid adding any HTML tag in your message.

This way, when the user receives the email, they can apply the discount code to their cart and also subscribe to your newsletter.
Note: If your Popup width is less than 400px, we suggest you to create a customized layout for Mobile. To create a New layout for mobile for your popup, Click the “Mobile” icon from the bottom of the editor and click the “Create Custom Mobile Layout”. Then you can copy all the elements from the desktop layout by pressing ctrl+a and then ctrl+c and then go to the mobile layout and paste them by pressing ctrl+v . You can then reposition and resize the elements to fit the Mobile popup.
