+ Getting Started
+ Displaying the Campaign
- Campaign Settings
- Set who should see the Campaign
- Set When the Popup should be displayed
- Set Where the Popup should be displayed
- How to embed Brave Content inside Posts & Pages
- Schedule Popups to display on selected Dates/Days
- Opening a Popup On Click
- A/B testing Campaigns
- Display Dynamic Text inside Campaigns
- Creating Personalized Campaigns
+ Creating Forms
- Creating a Contact Form
- Creating a Newsletter Subscription Form
- Creating a Quiz Form
- Creating a multi-step Survey Form
- Saving Form Submissions in WordPress
- Inserting 3rd Party Forms instead of Brave Forms
- Let Visitors Download a file when they submit the Form
- Let Visitors Optin with their Social Accounts
- Send Automated Email Replies when someone submits the Form
- Conditionally Display Form Fields
- Connect your Form to Zapier
- Advanced Email Validation
- How to save form submissions in Google Sheets
- Track Form Submission with Facebook Pixel
+ Tracking the Campaign
- Setting up a Campaign’s Goal Tracking
- Brave Advanced Analytics
- Get Real-time Email Notification When a Campaign Goal is completed by a visitor
- Get Real-time Push Notification When a Campaign Goal is completed by a visitor
- Get Real-time SMS Notification When a Campaign Goal is completed by a visitor
- Track Campaign Goals with Google Analytics
+ Integrations
- Integrate AWeber
- Integrate ActiveCampagin
- Integrate Mailchimp
- Integrate GetResponse
- Integrate Hubspot
- Integrate Mailjet
- Integrate Mailer Lite
- Integrate Convertkit
- Integrate Campaign Monitor
- Integrate ConstantContact
- Integrate Moosend
- Integrate Sendgrid
- Integrate SendPulse
- Integrate Sendinblue
- Integrate Ontraport
- Integrate Klaviyo
- Integrate Pabbly
- Integrate Zoho Campaign & CRM
- Integrate Mailpoet
- Integrate The Newsletter Plugin
- Integrate Mailster
- Integrate Sendy
- Integrate Omnisend
- Integrate Fluent CRM
- Integrate Neverbounce Email Validation
- Integrate Zerobounce Email Validation
- Integrate Truemail Email Validation
- Integrate Facebook Login
- Integrate Google Login
- Integrate LinkedIn Login
- Integrate Google Recaptcha
+ Tutorials
+ Woocommerce
+ Developers
Creating a Contact Form
Brave comes with an advanced Form Building feature that can be created within a few seconds and the form data can be sent to your emails or 1500+ apps with Zapier integration. You can also track form submissions with Google Analytics and send automated reply to visitor’s email when a visitor submits the form.
Let’s see how you can create a Simple Contact form in 4 simple Steps:
Step 1: Inserting the Form in your Campaign
From the Popup Edit Screen, Insert a Form to your Campaign by dragging the Form Icon from left panel and dropping it into your Canvas.
Step 2: Add Fields to your Form
After Inserting the Form, click it to open the Form Settings panel on Right. You can then edit the existing fields by clicking the Fields or add new ones by clicking the “+ Add Field” button. Let’s remove the Existing fields by expanding by clicking them and then clicking the trash icon.
Since our goal is to create a Contact form we will add 3 fields to our Form: a Full Name Field, An Email Address Field and a Message Field, where visitors can write the message body.
Let’s add the Full Name field first. Click the “+ Add Field” button and then selecting the “Input” field button. This will insert a new text Input field in your Form.
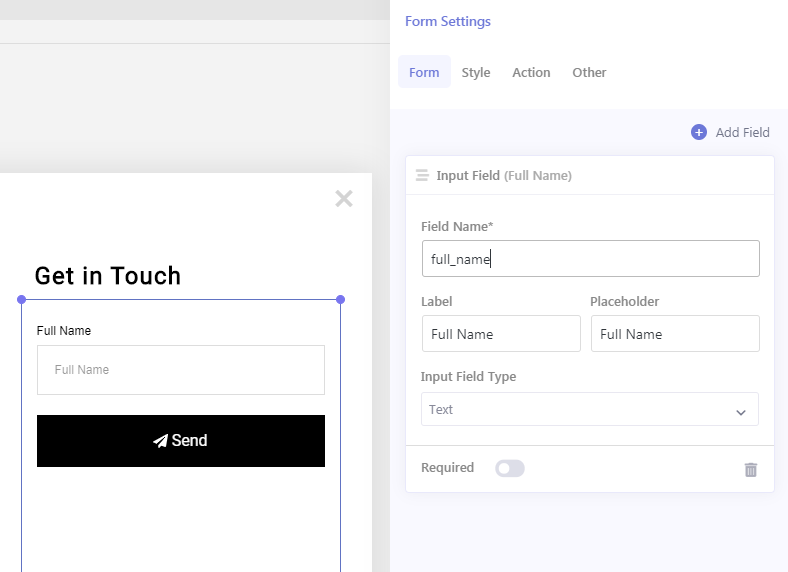
Field Name: All Fields have a “Field Name” option which is required. You need to insert a short name of the field based on their objectives. For example, if you have added a Text Input field to collect a visitor’s First Name, you can insert “first_name” in the “Field Name” field. This field name won’t be visible to your visitors. It will be only used in the emails that you will receive once the form is submitted by a visitor.
Since this field Name’s objective is to collect visitor’s full name, we will insert “full_name” in the “Field Name” field.
Label (optional): All fields display a label above the Form Field. You can set the label of that field by editing this field. Let’s Insert “Full Name” in this field, so that the visitor sees the label and knows they have to insert their Full name in this Form field.
Placeholder (optional): Input and text fields have placeholder options that can be used to display a Placeholder text inside the input/textarea field. This is mostly used when you do not want to show the field label due to aesthetic reasons, or you can insert small instruction on what visitor should insert in this field.
Let’s write down “Your Full Name” in the placeholder option field so that the visitor knows they have to enter their full name here.
Finally we will make this field required by enabling the “Required” option, so that the visitor must fill up this field in order to submit the form.
Now that we have a Full Name field, let’s add an Email Address field to where the visitor can insert their email address.
Click the “+ Add Field” button and select the “Input” button again. In the Field Name field write down “email_address”. And do the same for the Label and the Placeholder field. Now To make the field an Email Address field, we need to select “Email” from the “Input Field Type” option dropdown.
Finally, Lets add a Text Box field where the visitor can write the Contact form message that they are trying to send to you.
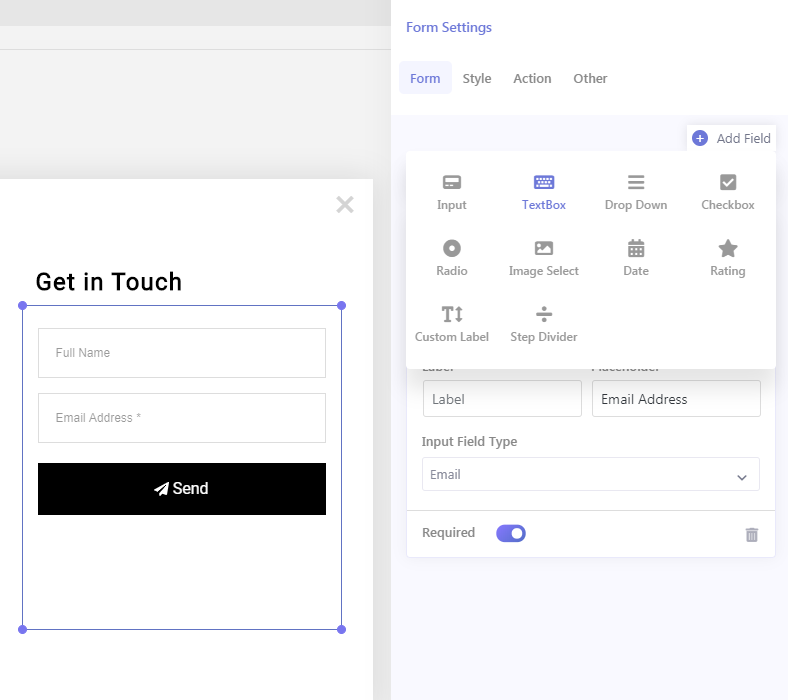
To add a text box field, click the “+ Add Field” button from top and click “Textbox” button. Now in the newly added textbox field, first write the field name “feedback”.
Then in the label field, write down “Your Message”. And we will keep the “Placeholder” field.
Now that we have added all the necessary Form fields, lets customize the form Button.
Step 3: Customizing the Style of the Form
With Brave you design the form any way you like changing vast amount of design options that can be accessed from the “Style” tab from top.
You can Change the Form’s font, font size, field color, border and lots of other appearance options.
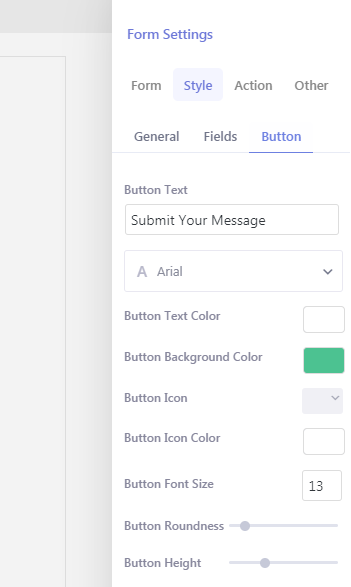
Customizing the Form Button
You can customize the Button field text and look by clicking the “Style” tab from top and then clicking the “Button” tab. This will display all the Button customization options. Let’s replace the default “Send” text with “Submit Your Message” by editing the Button Text Field.
Step 4: Determine what happens when a Form is submitted by the Visitor
Brave gives you the ability to perform multiple actions when a form is submitted. You can set what happens when a Form is submitted, by clicking the “Action” tab from the top.
A Brave form can perform multiple actions at once when they are submitted by the visitors. They can
- Send you an email.
- Add the visitor to one of your Newsletter
- Send automated email reply to visitor
- Send data to 1500+ apps with Zapier or Integromat
- Track the Form Submission by sending a custom event to Google Analytics.
Since we are building a Contact Form, we will enable only 2 options: 1. Receive an email 3. Send automated email reply to visitor.
To receive the message of the contact form, you will need to enable the Receive an email option. You can send the form data to multiple recipients by entering multiple email addresses with comma. You can also change the Subject line of the received message.
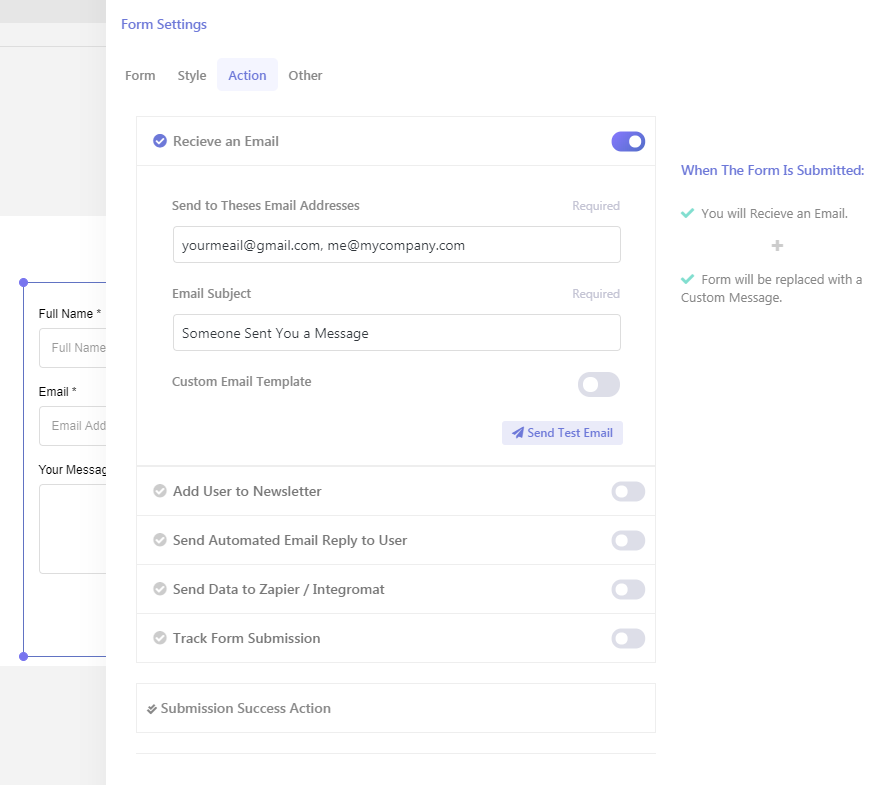
You can also customize the email body by enabling the “Custom Email Template” option.
Since we want Brave to also send an automated Reply email to the Form submitter, we will enable the Send Automated Email Reply to visitor option. Once enabled, you will be able to customize what email the visitor will get once they submit the form.
You can customize the email Subject line by editing the Email Subject field.
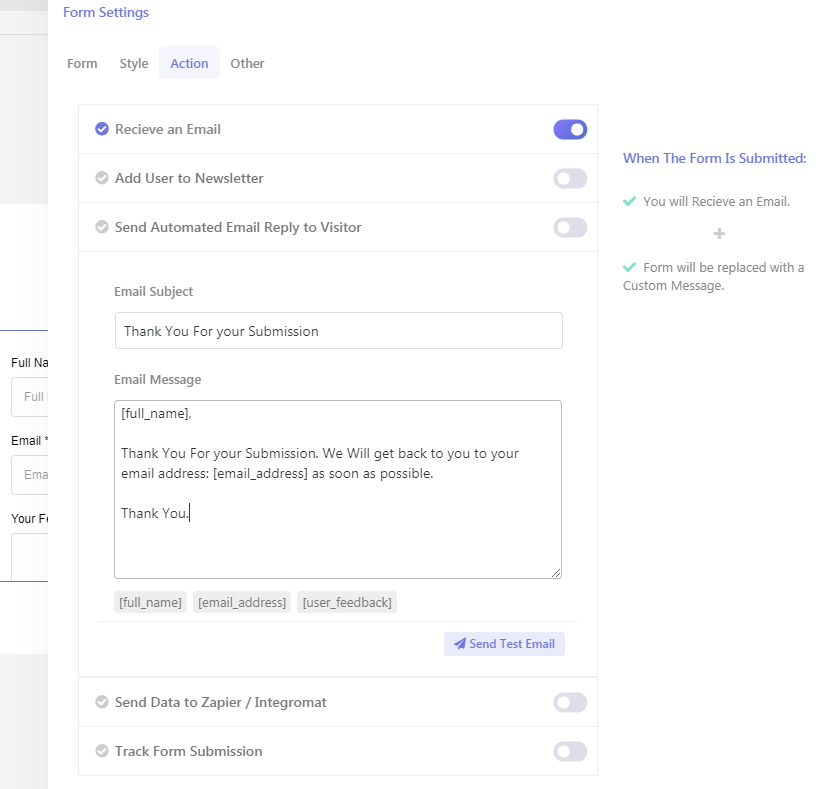
You can customize the email body, by editing the Email Message field. You will notice that they are 3 labels: [full_name] [email_address] [user_feedbak] below the Email Message textarea field. These labels are the ones that we have set in each Field’s “Field Name” option earlier. You can insert these labels in your Email Message textarea field to replace them with the values that the visitor inserted in the form when the email is sent to visitor. So if your visitor have inserted “John Doe” in the “Full Name” field, the [fullname], will be replaced with “John Doe” in the email body when they arrive in visitor’s inbox.
Showing Success Message
Finally we need to determine what the visitor will see after the Form is submitted. With Brave you can
- Display a Custom Message like “Thank You For your Submission”.
- Or, Redirect them to another Page of your Website.
- Or, Take them to another step of the Popup.
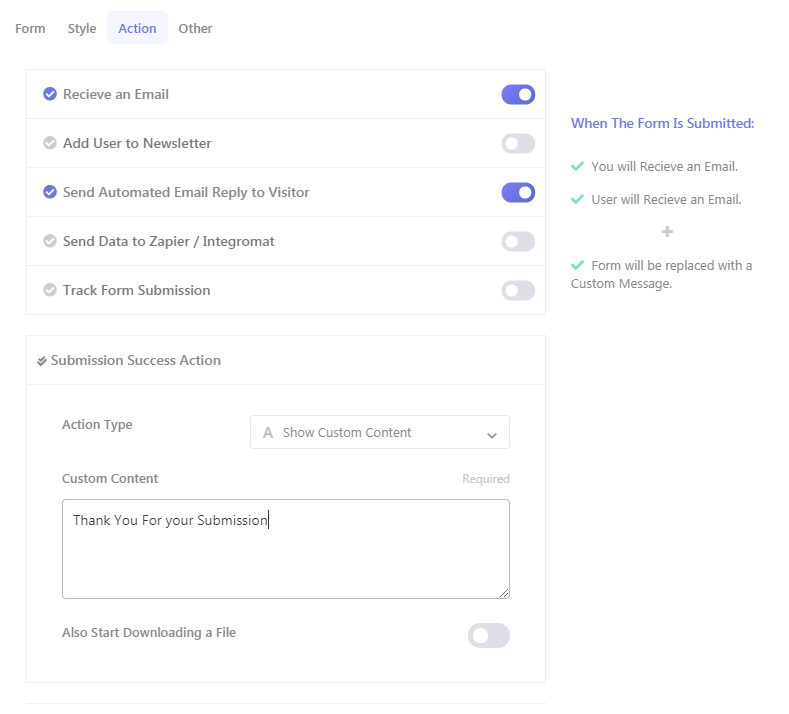
To set any of the above options, you need to click the “Submission Success Action” tab and then select “Show Custom Content” option. You can customize what message the visitor will see when the Form is submitted by editing the Custom Content field. Now once the form is submitted, the form will be replaced with your custom message.