+ Getting Started
+ Displaying the Campaign
- Campaign Settings
- Set who should see the Campaign
- Set When the Popup should be displayed
- Set Where the Popup should be displayed
- How to embed Brave Content inside Posts & Pages
- Schedule Popups to display on selected Dates/Days
- Opening a Popup On Click
- A/B testing Campaigns
- Display Dynamic Text inside Campaigns
- Creating Personalized Campaigns
+ Creating Forms
- Creating a Contact Form
- Creating a Newsletter Subscription Form
- Creating a Quiz Form
- Creating a multi-step Survey Form
- Saving Form Submissions in WordPress
- Inserting 3rd Party Forms instead of Brave Forms
- Let Visitors Download a file when they submit the Form
- Let Visitors Optin with their Social Accounts
- Send Automated Email Replies when someone submits the Form
- Conditionally Display Form Fields
- Connect your Form to Zapier
- Advanced Email Validation
- How to save form submissions in Google Sheets
- Track Form Submission with Facebook Pixel
+ Tracking the Campaign
- Setting up a Campaign’s Goal Tracking
- Brave Advanced Analytics
- Get Real-time Email Notification When a Campaign Goal is completed by a visitor
- Get Real-time Push Notification When a Campaign Goal is completed by a visitor
- Get Real-time SMS Notification When a Campaign Goal is completed by a visitor
- Track Campaign Goals with Google Analytics
+ Integrations
- Integrate AWeber
- Integrate ActiveCampagin
- Integrate Mailchimp
- Integrate GetResponse
- Integrate Hubspot
- Integrate Mailjet
- Integrate Mailer Lite
- Integrate Convertkit
- Integrate Campaign Monitor
- Integrate ConstantContact
- Integrate Moosend
- Integrate Sendgrid
- Integrate SendPulse
- Integrate Sendinblue
- Integrate Ontraport
- Integrate Klaviyo
- Integrate Pabbly
- Integrate Zoho Campaign & CRM
- Integrate Mailpoet
- Integrate The Newsletter Plugin
- Integrate Mailster
- Integrate Sendy
- Integrate Omnisend
- Integrate Fluent CRM
- Integrate Neverbounce Email Validation
- Integrate Zerobounce Email Validation
- Integrate Truemail Email Validation
- Integrate Facebook Login
- Integrate Google Login
- Integrate LinkedIn Login
- Integrate Google Recaptcha
+ Tutorials
+ Woocommerce
+ Developers
Installing & Activating Brave PRO
Follow these steps to upgrade to Brave PRO, Mega, or Ultimate after purchase:
Step 1: Download the plugin zip file from the Dashboard Page.
Step 2: And copy the license by clicking the eye icon.
Step 3: Now go to your WordPress dashboard, and then go to Plugins > All Plugins, and disable the Free version of Brave.
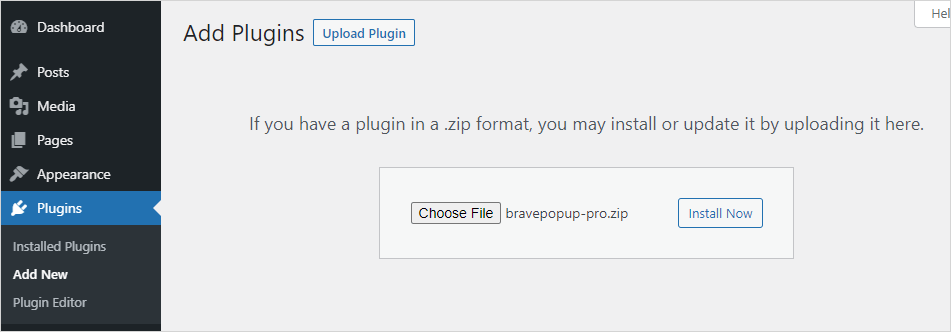
Step 4: Then go to Plugins > Add New, and click the “Upload Plugin” button and upload the zip file and activate the plugin.

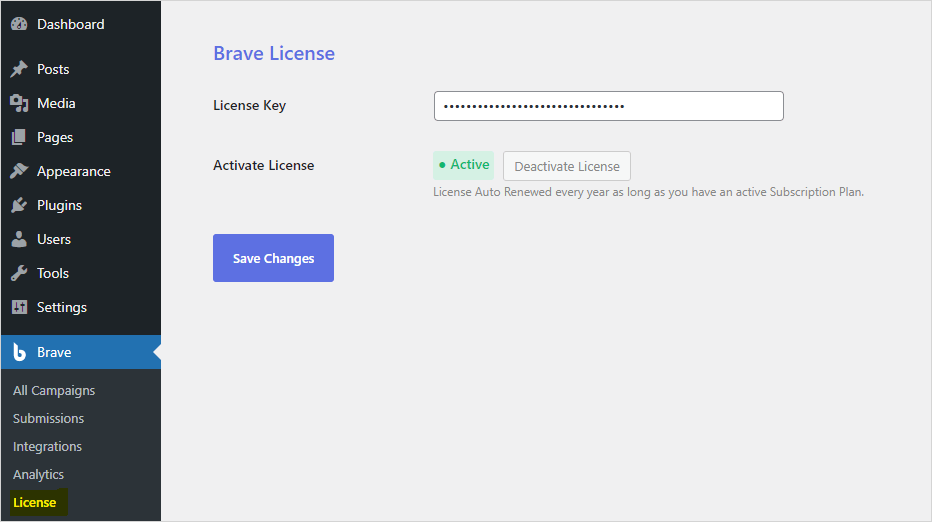
Step 5: Once you have done that, go to Brave > License, and activate the license.

Frequently Asked Questions:
Q. I purchase Brave PRO which only allows 1 site activation. How do I activate it on my staging site as well?
A. If you need to activate the plugin on your staging site, kindly send us a message through the contact page and we will add one more site activation limit for your staging site.
Q. I want to activate the license on another website, how do I do that?
A. First go to Brave > License from your current website and deactivate the license. Then you can activate the license on your new website.
Q. I cannot Activate the license. Its always saying “Inactive License”. What should I do?
A. Kindly make sure
1. Your site is not under maintenance mode.
2. You are not using any security plugin or cloudflare PRO. If you are using a security plugin, try disabling it and then activate the license.
3. You have copied the license correctly and there are no spaces at the start or the end of the license.
If that still doesn’t resolve the issue, kindly send us a message through the contact page.
