+ Getting Started
+ Displaying the Campaign
- Campaign Settings
- Set who should see the Campaign
- Set When the Popup should be displayed
- Set Where the Popup should be displayed
- How to embed Brave Content inside Posts & Pages
- Schedule Popups to display on selected Dates/Days
- Opening a Popup On Click
- A/B testing Campaigns
- Display Dynamic Text inside Campaigns
- Creating Personalized Campaigns
+ Creating Forms
- Creating a Contact Form
- Creating a Newsletter Subscription Form
- Creating a Quiz Form
- Creating a multi-step Survey Form
- Saving Form Submissions in WordPress
- Inserting 3rd Party Forms instead of Brave Forms
- Let Visitors Download a file when they submit the Form
- Let Visitors Optin with their Social Accounts
- Send Automated Email Replies when someone submits the Form
- Conditionally Display Form Fields
- Connect your Form to Zapier
- Advanced Email Validation
- How to save form submissions in Google Sheets
- Track Form Submission with Facebook Pixel
+ Tracking the Campaign
- Setting up a Campaign’s Goal Tracking
- Brave Advanced Analytics
- Get Real-time Email Notification When a Campaign Goal is completed by a visitor
- Get Real-time Push Notification When a Campaign Goal is completed by a visitor
- Get Real-time SMS Notification When a Campaign Goal is completed by a visitor
- Track Campaign Goals with Google Analytics
+ Integrations
- Integrate AWeber
- Integrate ActiveCampagin
- Integrate Mailchimp
- Integrate GetResponse
- Integrate Hubspot
- Integrate Mailjet
- Integrate Mailer Lite
- Integrate Convertkit
- Integrate Campaign Monitor
- Integrate ConstantContact
- Integrate Moosend
- Integrate Sendgrid
- Integrate SendPulse
- Integrate Sendinblue
- Integrate Ontraport
- Integrate Klaviyo
- Integrate Pabbly
- Integrate Zoho Campaign & CRM
- Integrate Mailpoet
- Integrate The Newsletter Plugin
- Integrate Mailster
- Integrate Sendy
- Integrate Omnisend
- Integrate Fluent CRM
- Integrate Neverbounce Email Validation
- Integrate Zerobounce Email Validation
- Integrate Truemail Email Validation
- Integrate Facebook Login
- Integrate Google Login
- Integrate LinkedIn Login
- Integrate Google Recaptcha
+ Tutorials
+ Woocommerce
+ Developers
Campaign Settings
Placement Settings
The placement section lets you place where your popups will be displayed. You can display your campaign on any page of your website.
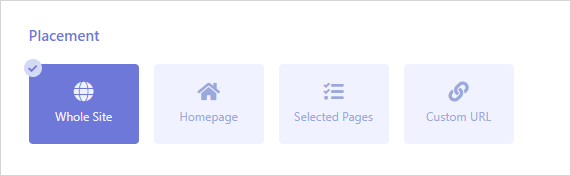
Whole Site: The Whole site option can be used if you are trying to display the popup throughout your whole site. If you want to exclude the popup from certain pages, you can simply select those pages from the Exclude section.
Home Page: If you want to display the popup on your homepage only, select the homepage option.
Selected Pages: If you want to display the popup on certain pages only, select this option. You can display your popup on selected pages, posts, products, archive pages, and custom post types.
You can select the pages where you want to display the campaign from the pages tab.
To display the campaign only on certain blog posts, click the Posts tab and select your posts.
If you only want to display the campaign on posts from certain categories, simply click the Category tab and select your desired categories.
You can do the same for tags from the tags tab.
If you have WooCommerce installed and want to display the campaign only on certain product pages, you can do so from the Products tab.
To display the campaign only on products that have certain categories, simply click the Category tab and select your desired categories.
You can display the Campaign to Posts Archive pages and Products Archive pages from the Archive tab.
If your plugin creates Custom Post types like events or real estate listings, you can select them from the CPT section.
Custom URLs: If you want to display the popup to a URL with a certain UTM or to a precise URL, you can use this option.
Trigger
The trigger section lets you select When you want to open the popup once the visitor enters the page. There are few ways to trigger the popups and you can combine some of these triggers.
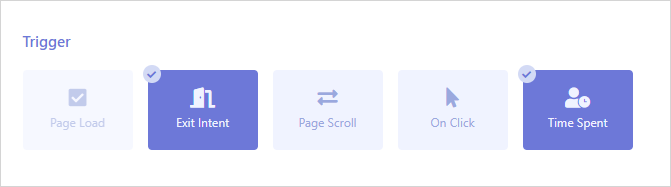
Page Load: To open the popup once the page is loaded, select the Page Load option.
Exit Intent: To open the popup, whenever the visitor tries to leave the page, use this option. The exit-intent does not work on Mobile devices. When you select this option, you will be required to select a separate trigger option for mobile-only. You can either trigger the popup on mobile on page load, on scroll, or after a few seconds.
Scroll: You can trigger the popup when the visitor scrolled to a certain percent of the page. If you want to hide the popup when the visitor scrolls up again, enable the “Hide again on Scroll Up” option. To display the popup when you want a visitor clicks a certain link or a button on your site, use the “On Click” option.
On Click: There are 2 ways to link the popup trigger with your button or link. The easiest method is adding the given code as your link’s URL. And another advanced method is to insert the unique class or ID of the button/link in the “Click Element Class/ID” field.
Time Spent: You can also trigger the popup after a few seconds of the visitor’s landing on the page with this option.
Audience
From the Audience section, you will be able to set who will see your campaigns.
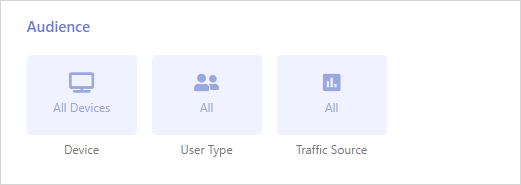
Device: The Device option Lets you display the campaign only to visitors that are viewing the page with a Mobile or a Desktop device. If you want to display the Campaign to Desktop users only, you can do it from here.
User Type: You can restrict the campaign to specific user types and roles with this option. If you want to display the campaign to users with certain roles, simply select registered user and then choose the Roles from the roles option.
Traffic Source: From this section, you can make the campaign visible to only those who came from a specific website or a webpage. You can enable the first option to match any users who came from a certain domain, instead of the precise URL. If you don’t want to display the campaign to visitors who came from this URL or domain, you can enable the second option.
Advanced Filter
The Advanced filter section is where you can granularly control who sees your campaign.

UTM Filter: If you want to display your popup only if the current URL contains a certain word, you can enable this option and then insert the word that you want to target. For example, if you want to display the campaign only to certain users with who you want to share the link, you can simply add a question and your desired word at the end of the URL. Now the popup will only open when this exact link is accessed by someone.
Cookie Filter: You can also display your popup to visitors that have a certain browser cookie. If you are adding a cookie to your visitor’s browser with your custom code or a third party plugin, you can simply create a new cookie filter by enabling this option and insert your cookie key.
Page Filter: From the Page tab, you can restrict the popup to only those who visited a certain page within a certain period. For example, if you want to display a promo code on your landing page only if the visitor has visited the page more than once, you can define it here.
Popup Filters: Just like Targeting visitors based on their Page Views, you can also target visitors who viewed or completed a goal of a previous Brave Campaign from the Popups Section. From this section, you can also hide a popup if another popup is currently displayed in the current page.
Country Filter: You can only display popups to visitors from certain countries from the Location section.
Woocommerce Filters: From the WooCommerce tab, you can access all the WooCommerce related advanced targeting features. You can display your popup only if the visitor has added a certain product to their cart. You can also display the popup only if the user has already purchased a product.
Advanced Settings
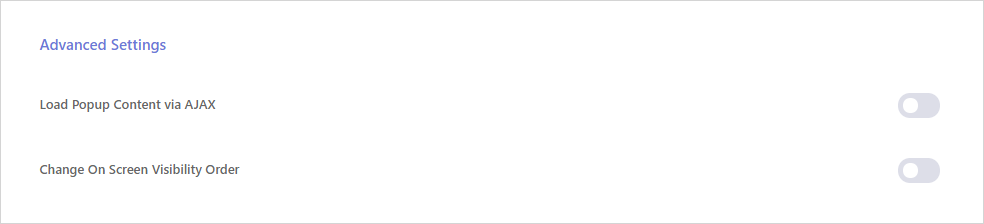
Screen Visibility Order: If you have a few popups on the same page and you want a certain popup to be displayed on top of another, simply enable this option and insert a positive number. The higher the number, the higher it will show up on the screen.
Ajax Load: By default Brave renders your campaign content (HTML) directly into the page. So the content can be picked up by Search Engine Bots. To prevent that you can load the content of the popup via Ajax. This option is also useful if you have embedded a large PDF and are only loading the popup on a button or link click. Since loading large pdf is unnecessary if the use doesn’t request it and it may slow down your site, this option can help prevent this.
Frequency
The Frequency settings let you control how many times you serve your popups to a visitor.

Option 1: You can display the popup only 2 or 3 times in their current session, hours, or days.
Option 2: If you want to keep showing the popup till the visitor completes the goal, you can turn on the second option.
Option 3: If you have a form in your popup, and you do not want to display the popup to the visitors that already submitted the form, you can use this option.
Option 4: You can also delay showing the popup for a certain number of days after the visitor closed it.
Option 5: If your has multiple steps in your campaign, you can enable the “Remember the Last Step” option to display the last viewed step when the visitor views the popup again.
Please note that when you are logged in as an admin, the frequency settings won’t apply to you and the popups will be always shown to you.